- Beranda
- Komunitas
- Entertainment
- The Lounge
EMP (Electro Magnetic Pulse), Cara kerja dan cara membuat.
TS
dhavacakep
EMP (Electro Magnetic Pulse), Cara kerja dan cara membuat.
Assalamualaikum.
Sesuai dengan judul saya akan membahas tentang EMP...")
Sekian dari saya wassalam
Sesuai dengan judul saya akan membahas tentang EMP...
Spoiler for Penjelasan:
Spoiler for HOW E-BOMB WORKS:
Spoiler for Cara Membuat:
Spoiler for Cara membuat . For yang males streaming atau lagi hemat kouta:
How to Build an EMP Generator
A favorite device of science fiction and action movie writers is the EMP generator. An EMP (or Electro-Magnetic Pulse) has the power to knock out all electronic devices within its range. Wall current, batteries, it doesn't matter: everything electrical just stops working. Think of the possibilities! One pop of an EMP generator, and that car next to you—you know the one, with the bass pumping so loud it makes your bones rattle—goes silent. Of course, so does your car. And wristwatch. And iPhone. Oh well, back to the drawing board—which is where we come in: we'll show you how to build a small EMP generator for fun. Be careful, though: the high voltages involved could be dangerous. Intrigued? Read on!
Steps
1. Obtain a disposable camera. It doesn't have to be anything fancy, just a cheap photo shooter that you can pick up at any big-box store.
2. Slip on a pair of rubber gloves. You'll be dealing with the potential of getting a painful shock should you accidentally touch the flash capacitor, which will carry about 300 volts when fully charged.
3. Open the case. Using the flat edge of a screwdriver, carefully pry the camera apart, being careful not to touch the printed circuit board or any metal parts inside.
4. Locate the large electrolytic capacitor on the PCB. It is commonly a black cylindrical item, with two leads coming out of the bottom.
5. Discharge the flash capacitor safely. First, check to see if it's charged. Turn on your voltmeter (if you have one), and set it to the 1000-volt scale. Place one probe on one lead of the capacitor, and the other probe on the other lead. If there is no reading, your capacitor may discharged. Slowly lower the scale until you get a reading.
If there's no reading, your capacitor is likely discharged already. If not...
6. Discharge the flash and remove the battery. Charge the flash by turning it on. You should hear that familiar high-pitched whine as the capacitor charges. When the capacitor is charged, a light will come on, or blink, or make some indication that the flash is ready.
7. Wind the film up until it clicks and stops. This sets the shutter so that you can shoot.
8. Click the shutter button. Don't look at the flash when you shoot! The flash should engage. As soon as it does, remove the battery so that the capacitor does not charge again.
Use a voltmeter again to check the residual charge in the capacitor. If there is, discharge it by placing a 100-ohm resistor across the the leads. Be careful to not touch the leads with your fingers if you're not wearing rubber gloves. You can get a nasty shock if the capacitor is still charged!
If you use a screwdriver to discharge the capacitor, it will make a loud bang and shower sparks and may do so several times. This is not the recommended method.
Repeat the process of checking the capacitor voltage until there is no voltage left.
9. Locate the charge switch on the front of the PCB. It should make a click sound when pressed. Peel off the tape and remove the button, then solder a toggle switch directly onto the solder pads revealed underneath.
10. Feeling adventurous? De-solder the trigger transformer and xenon flash tube from the PCB, and store or discard them as you wish. Alternatively isolate the section of PCB with the charger circuit and cut the rest off.

11. If not, skip the above step and continue by soldering two cables onto the two capacitor terminals. Wire one of these to a high current momentary switch. You can find those at Radio Shack or other electronics hobby store.

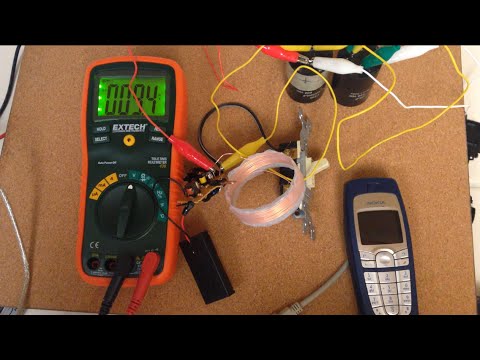
12. Form a load coil. Wrap 5-10 of turns of thick, insulated, stranded copper wire around a dowel approximately 1 to 2 inches (25-50mm) in diameter. With care, slide the windings off the dowel, and bind the coil by wrapping it with adhesive tape. You can also put an iron rod through the center of the coil as long as it fits snug, this will intensify the effects and range.

13. Attach the coil to the switch. Connect one of the leads of the load coil to the other unused terminal on the switch, and the other lead to the free end of the cable coming from the capacitor. You should now have a PCB with a switch to turn the charger circuit on and off and a load coil that can be switched across the capacitor.

14. Charge your EMP. Re-insert the battery. Place the load coil as close as possible to the desired target (such as a small electric toy, cheap calculator, or anything that's not valuable). Switch the charger on with the toggle switch, wait for the indicator to come on, then toggle the switch back off. This is done to prevent the charger from being damaged.

15. Fire when ready. Press the momentary switch to fire your TEPG. Please note, that this will have no effect on electronics encased in steel or aluminum—or any other metal, for that matter.
A favorite device of science fiction and action movie writers is the EMP generator. An EMP (or Electro-Magnetic Pulse) has the power to knock out all electronic devices within its range. Wall current, batteries, it doesn't matter: everything electrical just stops working. Think of the possibilities! One pop of an EMP generator, and that car next to you—you know the one, with the bass pumping so loud it makes your bones rattle—goes silent. Of course, so does your car. And wristwatch. And iPhone. Oh well, back to the drawing board—which is where we come in: we'll show you how to build a small EMP generator for fun. Be careful, though: the high voltages involved could be dangerous. Intrigued? Read on!
Steps
1. Obtain a disposable camera. It doesn't have to be anything fancy, just a cheap photo shooter that you can pick up at any big-box store.
2. Slip on a pair of rubber gloves. You'll be dealing with the potential of getting a painful shock should you accidentally touch the flash capacitor, which will carry about 300 volts when fully charged.
3. Open the case. Using the flat edge of a screwdriver, carefully pry the camera apart, being careful not to touch the printed circuit board or any metal parts inside.
4. Locate the large electrolytic capacitor on the PCB. It is commonly a black cylindrical item, with two leads coming out of the bottom.
5. Discharge the flash capacitor safely. First, check to see if it's charged. Turn on your voltmeter (if you have one), and set it to the 1000-volt scale. Place one probe on one lead of the capacitor, and the other probe on the other lead. If there is no reading, your capacitor may discharged. Slowly lower the scale until you get a reading.
If there's no reading, your capacitor is likely discharged already. If not...
6. Discharge the flash and remove the battery. Charge the flash by turning it on. You should hear that familiar high-pitched whine as the capacitor charges. When the capacitor is charged, a light will come on, or blink, or make some indication that the flash is ready.
7. Wind the film up until it clicks and stops. This sets the shutter so that you can shoot.
8. Click the shutter button. Don't look at the flash when you shoot! The flash should engage. As soon as it does, remove the battery so that the capacitor does not charge again.
Use a voltmeter again to check the residual charge in the capacitor. If there is, discharge it by placing a 100-ohm resistor across the the leads. Be careful to not touch the leads with your fingers if you're not wearing rubber gloves. You can get a nasty shock if the capacitor is still charged!
If you use a screwdriver to discharge the capacitor, it will make a loud bang and shower sparks and may do so several times. This is not the recommended method.
Repeat the process of checking the capacitor voltage until there is no voltage left.
9. Locate the charge switch on the front of the PCB. It should make a click sound when pressed. Peel off the tape and remove the button, then solder a toggle switch directly onto the solder pads revealed underneath.
10. Feeling adventurous? De-solder the trigger transformer and xenon flash tube from the PCB, and store or discard them as you wish. Alternatively isolate the section of PCB with the charger circuit and cut the rest off.
11. If not, skip the above step and continue by soldering two cables onto the two capacitor terminals. Wire one of these to a high current momentary switch. You can find those at Radio Shack or other electronics hobby store.
12. Form a load coil. Wrap 5-10 of turns of thick, insulated, stranded copper wire around a dowel approximately 1 to 2 inches (25-50mm) in diameter. With care, slide the windings off the dowel, and bind the coil by wrapping it with adhesive tape. You can also put an iron rod through the center of the coil as long as it fits snug, this will intensify the effects and range.
13. Attach the coil to the switch. Connect one of the leads of the load coil to the other unused terminal on the switch, and the other lead to the free end of the cable coming from the capacitor. You should now have a PCB with a switch to turn the charger circuit on and off and a load coil that can be switched across the capacitor.
14. Charge your EMP. Re-insert the battery. Place the load coil as close as possible to the desired target (such as a small electric toy, cheap calculator, or anything that's not valuable). Switch the charger on with the toggle switch, wait for the indicator to come on, then toggle the switch back off. This is done to prevent the charger from being damaged.
15. Fire when ready. Press the momentary switch to fire your TEPG. Please note, that this will have no effect on electronics encased in steel or aluminum—or any other metal, for that matter.
Sekian dari saya wassalam
Diubah oleh dhavacakep 06-07-2015 16:13
bapakejava memberi reputasi
1
44.2K
54

Komentar yang asik ya
Urutan
Terbaru
Terlama
Komentar yang asik ya
Komunitas Pilihan